Hey guys! I know you’re probably wondering what in the heck I’m doing here on a Saturday, but I wanted to pop in today with a fun little post. Over the past several months I’ve had a ton of requests on Instagram to share a tutorial for my go-to, volumized hair. I’ve been promising this post for a loooooooong time, but I just kept putting it off because I’m not exactly a pro at taking photos of myself–which you’ll soon see! But I did my best and I hope this helps those of you that want to know how I do my blow outs. This has become my go-to look over the past several years and it’s definitely my favorite way to do my hair. I’m sharing the whole step-by-step process from start to finish, so grab your coffee and let’s get to it!

OK, so here’s the most important part to getting a great blow out–your hair must be at least 85% dry when you start round-brushing. I know it seems counterintuitive to get your hair that dry before you even start in with the round brush, but it’s really important. If you don’t do that, it makes the job MUCH harder and it takes forrrrrrrever. Plus you’ll probably get frustrated and give up, which is what I always used to do. And here’s a little trick I do to speed up the process–I take a shower at night, then immediately after I will brush out my wet hair and put it in a twisted top-knot on my head like you see in the photo above. I’ll go to bed with it like this and when I wake up in the morning my hair is already about 50% dry. This really helps speed up the process because I don’t have to shower and my hair is already almost ready to start round-brushing. This of course won’t work if your hair isn’t long enough to put in a top-knot, but it’s a simple trick that has made the whole process much easier for me!

So I honestly don’t use a ton of fancy smancy products to do my hair. But the one thing I always swear by is this Blow Dry Volumizing Gel from Big Sexy Hair. I’ve been using this stuff for years now and it’s AWESOME. I put a pretty good dollop of it in my wet hair (yes, even when it’s been drying in the top-knot over night) and I focus mostly on applying it at the roots and then working it down through my hair. I also recently started using this Amika Bombshell Blowout Spray, which I’ll talk more about in a minute. And lastly you’ll need a large ceramic round-brush. And a blow dryer of course, but you knew that.

Step 1: To start I section off my hair and always begin on at the bottom of my head then work my way up. I take small sections of my hair, tightly wrap it all the way around the brush and slowly pull it down while turning the brush in circular motions as I go. I also hold my hair up and straight out from my heard, which really helps to add volume.

Step 2: I slowly work my way around my head, making sure to get each section completely dry before moving on to the next. My hair is really thick and frizzy, so it’s important that I get each piece soft and smooth before starting on the next section. Then when I get to the ends I spend a few extra seconds turning the brush in circular motions like you see here to give my hair a soft curl.

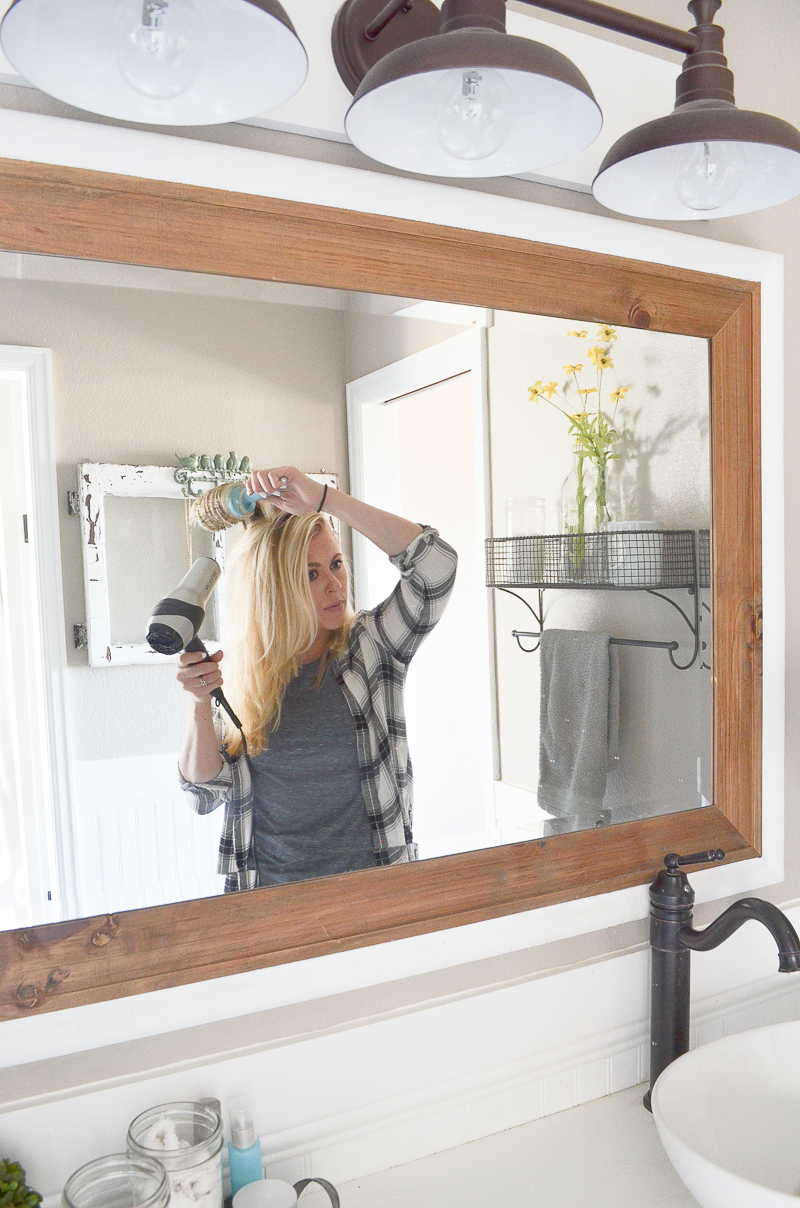
Step 3: Once I get through the bottom sections of my hair I grab my Amika blowout spray. I spray it on the roots of each section on the upper half of my head before starting in with the round brush. This stuff adds a ton of volume, so a little goes a long way. One small spray is plenty for each section.

Step 4: For the sections around my face and on the top of my head I always hold my hair straight up while I’m blowing it dry. This is the key to getting more volume. I typically hold it straight up for at least 5 to 10 seconds with the blow dryer pointed directly at the roots. Then I’ll go ahead and pull the brush through my hair in circular motions as I work my way down.

Step 5: I always end by taking the front section of my hair and holding it straight up while blowing it dry, slowly turning the brush as I go to give it a nice curl. Doing it this way gives me a ton of volume around my face, which is what I like.
Lastly I’ll go through my hair and give any pieces a little extra curl if needed. Since my hair is pretty thick I can sometimes miss small pieces as I go, so I just like to make sure it’s all dry and smooth. I don’t often use hairspray, but when I do I really love this Kenra volume spray. And if you’re looking for something to give you even more volume, I highly recommend this Oribe Dry Texturizing spray. It’s absolutely AMAZING and gives a ton of texture/volume when you spray it on your roots. I have a small can of it and it’s incredible.


Learning to do a blow-out was really one of the best things I’ve ever done. I know that might sound dramatic, but I used to absolutely HATE my thick, frizzy hair. I had absolutely no clue what to do with it until about 5 years ago. But when I finally learned how to work with it instead of against it, everything changed. This has become my go-to look and now I actually enjoy doing my hair when I get the chance. I mean, what’s better than a good hair day?!
Well I hope this post was helpful and gave you a few ideas for your own hair. I’m obviously not a professional hairstylist in any stretch of the imagination, but this is just what I do and it works for me–especially with my little night-time top knot! Be sure to let me know if you have any questions, I always love to chat. xoxo
A few other posts you might like:
A Day in The Life As a Blogger & Mama to 3
Pin for later:


great, thick hair. lucky you
Looks awesome. I will definitely try it out tomorrow. Have to sleep with my hair up tonight.
Thanks for the tid bits!!!
Yay I hope it works for you Judy!
Sarah it worked thank you.. I didn’t have in house the same products that you used, but was the same effect. Loved it and I shared your technique with my two daughters..
Oh and your kitchen looks amazing. Love the farm sink and the counter tops. Turned out so nice cant waite to start my own kitchen project!!! ( love the white)
Oh yay, I’m so glad it worked and thank you for sharing it with your daughters!! xo
Beautiful! I have tried to do this, but always gave up. Now I realize I wasn’t letting my hair get dry enough before I started. Thanks for the tips, I will definitely try it again.
I hope it works for you Darcy!
i waited for this lol, I absolutely love your hair, it’s gorgeous! Thank you for showing us!!
Thank you so much Corinne!!
Just last week one of the morning talk shows had a woman on who started a business, I think called Blow-out. Flagship store is in NYC, but it may be franchised. No cuts or color, only blow-outs. Takes 30 minutes and caters to busy women and young moms who occasionally need a special feel-good or to be reminded how beautiful they are. Stressed that the secret to good hair is the blow-out, but didn’t mention the part about getting your hair 85% dry. Thanks for that!
Oh wow, that sounds like a cool place. I’ve heard of more and more salons the are doing only blow-outs!
When you wrap your hair around the round brush are you wrapping your hair inward or flipping your hair outward? Thank You for giving us this tutorial!! So helpful – and your pictures turned out great! The struggle was worth it haha
No I don’t flip it outward, I go under with each section. Sometimes I’ll turn the round brush to the side, so it’s almost vertical to the floor. That gives a nice curl too. But never flipping outward. Hope that makes sense!
Sarah, your stories made it sound like this post was going to be a ‘wash out’!! It turned out great! I’m totally going to try it!! Thank you!!
Well these were just about the ONLY pics that turned out very well. Thankfully I scraped enough together to make it work! Thanks for dropping by Jenifer. xoxo
Can’t wait to put these tips to use, great post. Your hair is beautiful!
Thanks you so much. And I hope it works for you Penny!
Thank you for the tips!! I also have long straight hair, a bit in the frizzy side. I’m trying this tomorrow!!
Yay I hope it worked for you Nancy!
Love the post and love your hair! Will have to try these products. Thanks! Meg
Thanks so much Meg!
Thanks for these tips and for providing product info :0) Two quick questions – Do you add the hair gel on your wet hair before putting in the knot for bed, or the next morning after taking it down before blowfrying? Also, do you wash every day? If not, what do you do to keep volume on day 2 or 3 hair?
Thanks!
Hi Kimberly! I add the gel in the morning after I take my hair out of the top-knot. I suppose you could do it at night before you pull it back, but I haven’t tried that. And I don’t wash my hair every day, I usually can go 2 full days between washings. Dry shampoo does wonders to help the blow out last longer and give volume! I love Batise (you can find it at Target) and my new favorite is this one here: https://rstyle.me/~a9hce
Thanks for the wonderful tutorial. You have beautiful, thick, healthy hair.
Thanks so much Ivory!
Does this work for curlyish hair? I usually blow dry it with a round brush if I’m styling it but letting it dry over night… I’m curious if it’ll work for me? Any recommendations?
Thanks so much!
Also BEAUTIFUL hair!
Ashley
Have recently started following your Instagram and now blog and am really enjoying your posts! Your hair is beautiful … lucky girl!! Looking forward to reading the rest of your blog posts. Have a great night!
Aw thank you Mary, I’m so glad to have you following along!
These are great tips! Thank you for that! 🤗 what shampoo & conditioner do you use to go along with these products?
Love this tip awesome. I’ve ordered the volumizing gel but im finding it hard to get my hands on the Amika Bombshell Blowout Spray…
Quick question is there an alternitive to the Amika product and what do you recommend? ,oh and can any colour hair use this product. Thanks Sarah.
I have thick frizzy hair and my hair dresser does the perfect blow out on my hair sometimes I’ll just go to her for a blow dry!!! Ok I’m going to try this this morning! I’ve never been able to do it myself!!! I’ll let you know 😬THANK YOU for this Sarah!