Good morning buttercup and happy Monday to you!! I’m so excited for today’s post for two reasons. First, I haven’t shared a good ol’ fashioned DIY project in a while and this one is pretty fun. And second, this project involves vintage ceiling tin, which is basically the coolest thing ever. You guys, I have ALWAYS wanted to find a way to use vintage tin in one of my projects. I just love it and I think it has so much character and beauty. Most of it comes from old homes built in the late 1800’s and even old churches too, so there is tons of history with them. Anyway, I came up with a way to use a piece of tin to make a super easy DIY coat rack and I’m SO pumped to share it with you guys today. Really, this may be one of my favorite DIY projects yet. OK, here’s the piece of tin I found that inspired this project:

I snapped this with my iPhone, so I apologize because the quality isn’t great. But you can still see how pretty it is. I actually found this at one of my favorite antique shops and I just love all the details and chippy paint. I thought it was the perfect size to turn into a coat rack using these farmhouse-y hooks, so I grabbed a piece of wood we had sitting in our garage and got started.

This is just basic piece of pine that I painted white. My ideas was to wrap the tin around this piece of wood.

First I laid the tin over the wood and positioned it so it was hanging over the edges a bit. The wood was a few inches shorter than the tin, which worked out perfectly. Then we simply screwed it to the wood. (If you do this make sure to pre-drill the holes first, it makes the job much easier!)

Once the tin was in place, the next step was bending it over the edges of the wood–basically like wrapping a present. This was pretty easy to do because that old tin is very pliable and easy to work with. Then we placed screws in the sides to hold it in place. Easy peasy lemon squeezy.


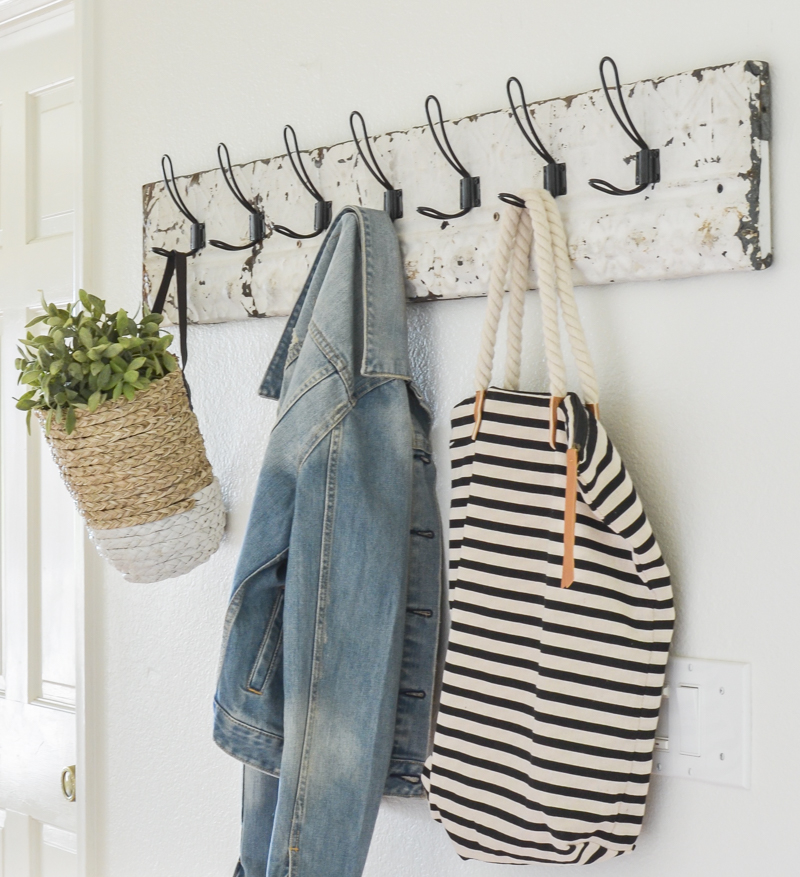
And that was it! Next up was screwing the hooks into place, which only took about 15 minutes to do. Here’s how it looks now:


Snazzy, huh? I really love how this turned out. It’s exactly like I envisioned and I think it gives our little hallway so much character. Plus it’s nice to have the extra space to hang coats and bags.


If you look closely on the upper half of the tin, you can see a line of small crosses. I love those and it kinda makes me think this tin may have been on the ceiling of an old church.

I really love being able to repurpose things like old vintage tin into something new and useful. It’s one of my favorite things to do and I’m just grateful that I get to share my projects here with you guys. This coat rack turned out pretty cool and it really didn’t take very long to do, which seems to be how the majority of my DIY projects go around here. Easy, quick, and useful with a touch of vintage charm. That’s my favorite combo!
Thanks so much for hanging out with me today. Here’s a few other easy peasy DIY projects you might want to check out:
A Simple DIY Farmhouse Style Lamp

I absolutely LOVE this!
So creative and I enjoy seeing materials repurposed into something useful! Great job!
Thanks Liz!! xo
Did you have any issues with paint popping off as you bent the metal? I have a perfect piece to try this with but am I afraid the paint may come off as I bend it.
Yep, a little paint did pop off but not too bad!
This is just beautiful! In my area we don’t have any antique stores that carry great pieces like this tin😥. Would you be interested in making one? Please contact me I am very intrested this is what I’ve been looking for, for my foyer.
Ah I wish I could make more. I need to find more tin like this. Maybe if I can track down a lot of it I will!
Oh, I love thi DIY!! Exactly what I need for our mudroom. I’ll be looking for some old tin now 🤗 Happy Monday!!
Yes Amanda, go find yourself some tin!
Super clever idea, it looks great, love the details in the tin!
thank you Laura!
I love It!! Thanks for sharing!
Thanks for stopping by Linda!
Good Monday morning Sarah, love the old tin coat rack! I do have a piece of tin, little shorter than yours but maybe if I just put two books on it. I’ve it! Thanks Sarah. xoxo
Yes!! you could totally make a smaller one Becky.
Beautiful. I want one!
Thanks Wanda!
Hi-this looks so cute! Where could I find those hooks? Thanks!
They’re from Amazon! https://rstyle.me/n/c76fc5b6hgf
What a clever idea!! I always love your DIY’s. I’m going to be on the hunt for some old tin….. thanks for sharing.
Thank you Nikki! So glad you dropped by. xoxo
This really came out adorable luv it!
thanks Ann!
So cute and creative-love this DIY! Great job!
Thank you Dori!
I’m so impressed! I see tin like that every once in a while that I would love to buy but never know how to use it. I had no idea it would be so easy to work with. I’m getting it next time. Thanks for the great tutorial!
Thank you Kathy!!
Love this!! You are so creative and inspiring! I will be looking for old tin for sure! I have the perfect spot for something like this!
Oh awesome!! Go track down some tin Abby!
Love! Great job! I love old tin as well. What a great project 😊
LOVE IT!!!!!!! You are so cleaver, I would have never thought in a million to do this.
WDid you teat for lead paint?
Boy fumble fingers this morning.I said did you test for lead paint.
No, but I might test for it soon. Lead paint isn’t an issue unless you’re breathing in the dust while sanding it or eating the paint chips. I won’t be doing either of those!
love it, sarah! bending the tin looks like the tricky part but overall an easy beautiful DIY. love the look. perfect.
kim xx
Oh how pretty!!!
What a clever idea! I love it!!
What a fun project! I’m going to be on the lookout for vintage tin!
I love this so much, it is an amazing looking piece…such a great idea!
Love it! What a great job!
So cool! Might have e to try this! Thanks for sharing your awesome idea!
Wow! I love it. Tell me….how did you afix it to the wall so that it’s sturdy?
We just screwed it to studs in the wall!
Love it!
Thanks Moriah!
Sara,
That is so neat!! I love it!!
thank you Lynnette!
That is beautiful! Great patina and really adorable! You come across the best stuff! I need to go shopping with you!
Thanks Maggie, let’s go antiquing anytime! 🙂
That is adorable. I’m going to do this and put in under my farm sink in my kitchen . What I need to know is did you seal that tin and if so with what ?
Nope, didn’t seal it at all!
I love this!! So cute and very farmhouse!! I’m doing this and my wife is going to love it! Thanks!
Where did you find the hanging basket and greens?
The greenery is from Marshall’s and the basket is from Anthropologie!
Oh my goodness, I love that used this wonderful piece of tin! I have a like DIY rack I made for the bathroom and hand towels. I used a piece of old weathered fence board and found antique hooks that were left in my 120-year-old barn by long ago owners that I twisted into the wood. I just love it! Beautiful and easy.
Hi Sarah, Could you share the dimensions of the board and tile you used? And is the tin you found a cornice piece? Thanks- love the look!!!
Good Morning Sarah
I wish that my brain would work like yours…lol. ..I love this idea and I also love the old tin roofs.
I once wallpapered a bathroom ceiling that looked like a tin Victorian roof. I had to paint it and it was a lot of work, but loved it
Where did the basket come from you hung?!
This project is gorgeous! I love old tin! Since everyone doesn’t have access to the real stuff, i was thinking it might work to buy the fake kind from Lowes or even Dollar Tree, slap some chalk paint on it and attach it to a board like you did then add the hooks! I’m ordering those hooks!!