Well hello there friends and happpppppy Monday! How was your weekend? I hope it was wonderful and full of happy things. It was pretty calm around here, which was a nice break from our usual weekend craziness. We’re normally running around trying to do about 13 things at once, but this weekend was more laid back and relaxing. Which means I’m bright-eyed and busy-tailed this morning, ready to get after a new week! I hope you are too. Today I’m here to talk to you about vignettes. Yes, my friends, vignettes. I’ve gathered up 5 tips for creating a farmhouse style vignette and I’m pretty darn excited to share these pointers with you today. But first things first. You might be wondering the heck a vignette is anyway? I’m going to be real with you guys here. I didn’t know what vignette meant until about a year and a half ago. True story. I mean, who even says vignette? I sure as heck don’t, but I guess I’m not that sophisticated. Anyway, it’s just a fancy way of describing a small grouping of decor, that you might see on a coffee table or shelf. Maybe even at the center of your dining table. The basic idea is to round up a handful of items and style them together in a way that looks cohesive. Sounds simple enough, but it can be a bit tricky to piece together just the right things to make it work. But have no fear my friends, I have a few tips that will make the entire vignette-styling-process a complete breeze!

1. Use a Tray
Step number one for any vignette I do is to start with a tray or some kind of base. You could use a variety of things, so get creative with it. The key is to have a foundation to build up from. Does that make sense? Think of the tray as your boundary that helps define the vignette and pulls everything together. I’ve found that without a tray or some kind of base, I struggle more to make it all come together. For example, check out this super simple vignette I put together without a tray:

We can probably agree this is a cute little vignette, but it doesn’t seem complete, right? Now let’s add a tray and see how it looks:

Ta-da! It’s so much more pulled together and complete now. I kept the exact same pieces, nothing has changed except adding a tray, and I think the difference is pretty remarkable. Keep this in mind when you’re starting to put together any vignette. Start by grabbing a tray or base of some kind and work up from there.
2. Old Books
When you’re looking for items to include in your vignette, be sure to grab a few old books. I put old books in every one of my vignettes. No matter what else I may include, you can bet your bottom dollar that there will be old books. Not only are they going to add texture and vintage charm, but they’re also a great way to stagger items in height–which I’ll talk about in a jiffy.

3. Greenery or Flowers
After grabbing a few old books, I always make sure to get some greenery or flowers in the mix. It doesn’t have to be much to make an impact, but it definitely adds some spark to the overall look. And spark is good.
4. Stagger Items in Height
This one can be a little tricky, but you want to make sure the items in your vignette are all varying heights–although they need to be close enough in height so they all seem to fit together. Clear as mud, right? Here’s an example:
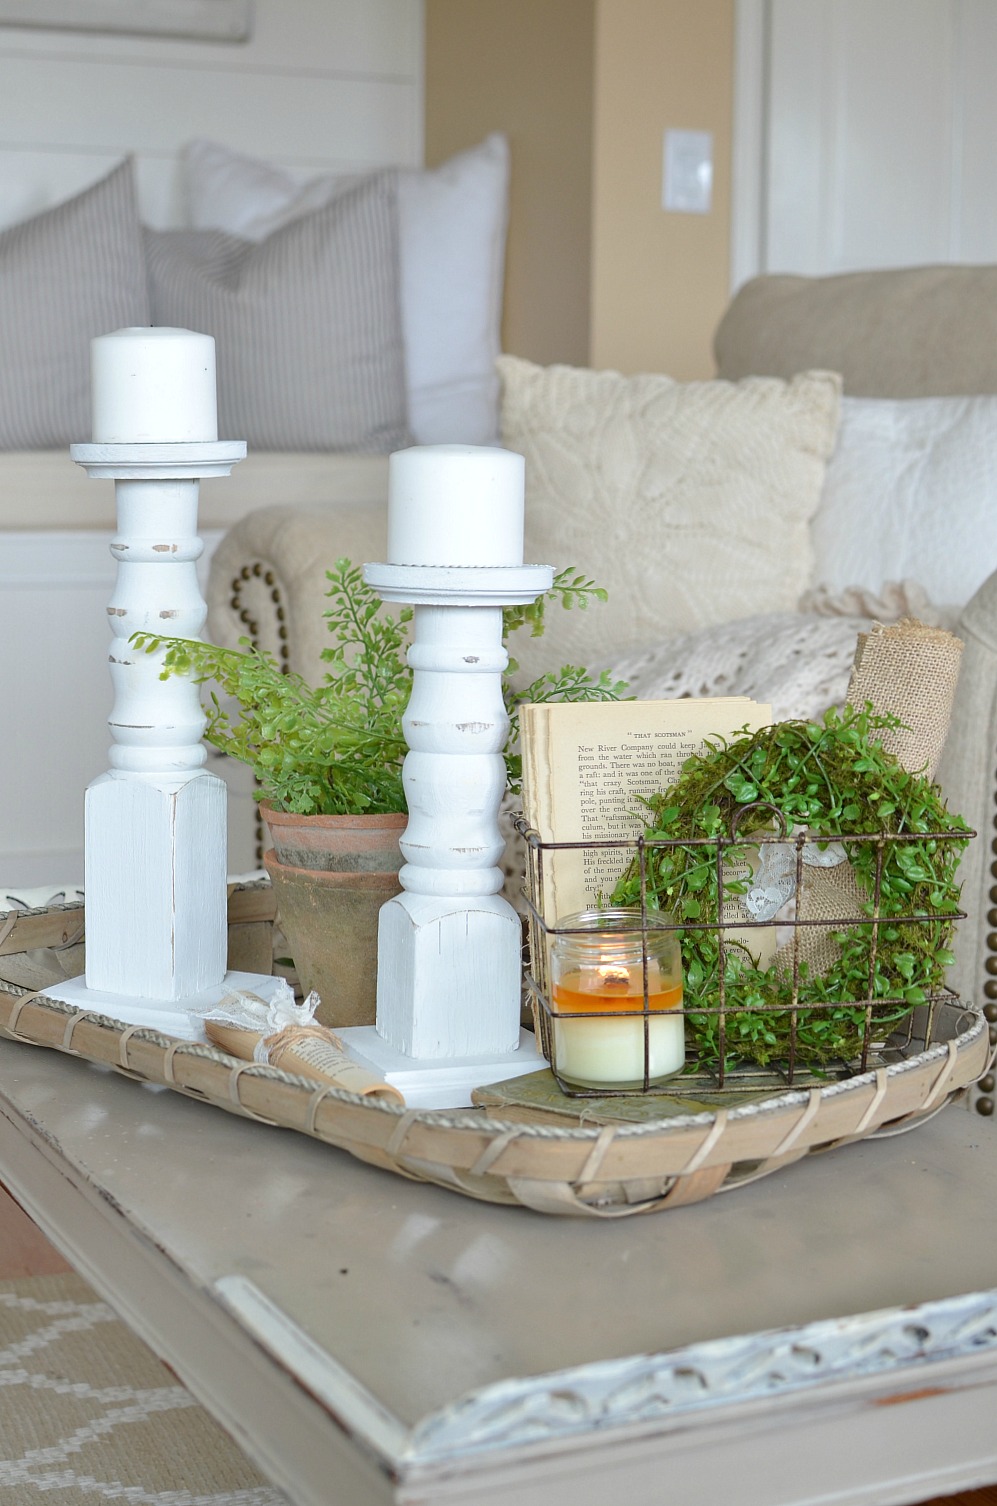
So I started with this handy tobacco basket, which by the way I found at Hobby Lobby for super cheap. Did you know they’re carrying tobacco baskets now? YES. Go get yourself five. Anyway, working up from that as my base I grabbed my spindle candlesticks and placed them in the middle, then filled in around those. This tobacco basket gives me lots of space to work with, so I included several different items in this vignette. And they’re all at different heights. I marked up this shot so you could see the varying heights a little more easily:

Everything staggers from the upper left, at the highest point, then it kind of slowly starts moving down in height until we’re at the little candle. I wanted to show you the same image with these marks to illustrate how everything staggers downward little by little, which I think really helps pull it all together. If I had only used the tall candlesticks and the small candle for example, the drastic differences in height would have been obvious. And it just wouldn’t flow as well. So think of your vignette heights as staggering down slowly from the tallest to the shortest item.
5. Keep a Cohesive Color Scheme
As with any decorating, I think it’s important to keep the same color scheme throughout your vignette just so it’s all pulled together nice and pretty. I’m obviously partial to the farmhouse look, so I don’t tend to include a lot of hot pink or red in my decor. But if that’s your thing then roll with it. Just try to bend the colors together in a way that is cohesive. Does that make sense? Here’s an example of how a few differences in color can make a difference in your vignette:

Ok let’s break this down. My eye is immediately drawn to the pops of white in this vignette. The white lace on the roll of burlap, the white candlestick, and the white baby’s breath. It’s all very soft, yes? Now looking at the antique sifter with the green plant–it seems off to me. Possibly a bit too “loud” for this look in my personal opinion. The tone of the sifter competes with the galvanized canister the flowers are in and the bright green color of the faux plant just doesn’t seem cohesive with the rest of the look. Look how it changes here:

I simply changed the plant and used a white vase instead of the antique sifter. This pulls it together for a couple of reasons: 1) the white pitcher plays off the other white accents in this look and adds to the soft vibe of the whole look; 2) this faux plant isn’t such a bright green, like the one I was using before. It’s a little more subtle and it even has white tips here and there. Overall I think this combo blends better and compliments the color scheme of the entire vignette. Now, I may be being a bit picky here, but you get the idea: choose colors that compliment each other.
There ya have it–my best tips for creating a simple farmhouse style vignette. I hope you found this post useful! Now, keep in mind there are about a zillion ways you can style a vignette. These aren’t rules, folks. These are simply my suggestions and a few things I keep in mind when I’m styling a vignette. Feel free to mix it up and do whatever your little heart desires, there’s certainly no wrong way to do it. And for heaven’s sake, have FUN with it and get creative. That’s the whole point, right? So turn some music on, pour yourself a cup of coffee, and just enjoy the process.
Thanks for being here and let me know if you have any questions!
A few other tips you might enjoy:
5 Ways to Style a Wooden Crate

These are great tips and will help me styling trays. Thank you!
Thanks Doris, so glad you dropped by this morning!
Great ideas! I’m falling in love with vignettes, I’ve done them for awhile but realizing I need to use more trays as bases. I’m having trouble finding where to pin your posts. I see the icon for Pinterest that directs me to follow you on there, but I can’t seem to find the option for pinning the post itself from your emails and Facebook posts. Help!
Oh no! If you want to Pin an image, just hover over the image with your curser and you should see the red SAVE button in the upper left hand corner. Then you can pin that specific image. Hope that helps, let me know if you don’t see it. And thanks for stopping by Vicki!! Have a great Monday.
Great ideas, Sarah! I love styling vignettes and get so much inspiration from you! Truth be told, some of my vignettes are a pretty similar copy of yours! Right now, my table has some gorgeous baby’s breath and mini roses in vintage jars from my newest collection obsession (thanks to you!!!????! I also love tobacco baskets and went straight to the Hobby Lobby site and of course they are sold out, sigh!
haha I love that Heather! We are kindred spirits. And what a bummer about the tobacco baskets being sold out. I need to swing by there and see if they still have any at my local store–they’re so handy!
Mine had it and it was half price this week!!! Also, I’m curious to know where the basket came from. I have searched everywhere for one the same size.
Wire basket that is.
I have not tried this yet. What a great idea. I have a lot of stuff around so am going to try grouping them. Thanks.
Sheila
Definitely give it a try Sheila!
Oh my goodness ! I’ve read a lot of post about vignettes but this is the best ever -you break it down so well and I love the way you showed pictures of each example.
Thanks Marilyn, I try to make it as simple as possible! And photos can do that easier than words can sometimes!
Thank you for the cute ideas! I love the use of the metal sifter! I would never have thought to use that. I am going to have to grab mine out of the kitchen today!! Happy Spring!
Heck yes Jennifer, get that sifter out and put something pretty in it! 🙂
Great post, thank you Sarah. Love that baby’s breath is making a comeback, where did you find yours…is it real or faux?
Thanks, it’s actually real. I just get mine at the grocery store!
Great tips!
I love all of these vignettes! They are so stinkin’ cute! You’re totally right – the trays pull everything together!
Great post, Sarah. Super helpful, and I love how you gave us so many examples. The tray really *does* make a difference!
Thanks Julie, I’m glad you enjoyed it!
Tks so much for accepting me and for printable. ..
The candle sticks holders did you make those and if so how.
I did make those Pamela, you can find the tutorial here: https://sarahjoyblog.com/the-easiest-diy-farmhouse-candlesticks/
Oh Sarah! Thank you! I can finally do “farmhouse” with ease & confidence. I never subscribe but with you, I had no second thoughts! Im so excited ….
Aw thanks so much Myla, so happy to have you here!! xo
The wire basket is beautiful! Where did you find that piece?
Just discovered your site and am smitten! Such great tips for a “new to farmhouse look” gal like me.
Thank you so much, beautiful ideas love them
Just LOVE your great vignette ideas & pics. Can’t wait to try them – so simple, yet so elegant!! NICE work!!!
I appreciate the tips! You gave me some good ideas. In your last example though, i am not sure about having 2 plants. I think just 1 may be better… or 3? Maybe i am stuck in the old design rule of odd numbers?! I have a couple trays and i keep moving things on and off it because i dont feel its quite right yet. I will use some of your tips to get me there!
Your decorating is gorgeous. You gave me so many good ideas. Can you give me the color and brand of the paint color on your walls?