Today I am sharing the step-by-step process we used to turn an old dresser into a bathroom vanity. We used this process on two dressers for our master bathroom renovation and I could not be happier with how they turned out. Please keep in mind we are not experts, this is simply the process we used. I’m sure there are variety of ways to get this done, but this was our strategy and I think it was actually fairly simple–plus the drawers on the dresser are still functional, which is a huge plus in my book. I’ll be sharing everything you need for this project and all sources will be listed at the end of this post, so be sure to check that out if you’re preparing to do this in your own home!

First thing you’ll need is an awesome dresser. I have a few tips after going through this process:
- look for a dresser that is at least 34″ tall and at least 20″ wide. You’ll definitely want counter height, plus it needs to be a little wider so there is plenty of room for the sink. Turns out most dressers aren’t that tall, or that wide, so this was the hardest part of our search.
- find dressers that are made of solid wood and sturdy. This is super important. You want the dressers to be really high quality and well made.
- look for French Provincial style dressers. No big reason other than I think they work best on this type of project. And they’re so darn purdy. But that’s a personal preference!

Here’s the before.

We started by removing the back cover from the dresser. You won’t need this anymore!

Then we drilled in two holes for the faucet and the sink drain. In order to figure out where exactly we wanted the holes we simply placed the sink and faucet on top of the dresser, in the middle, and played around the with positioning a bit until we felt like the sink and faucet were a good distance apart. For this sink/faucet combo we wanted it right in the center of the dresser. But for the vanity I use, which is much larger, we actually put the sink off to the right side of the dresser so I would have a little hair & makeup working area. It’s your choice!
For the faucet hole we used this 1 and 1/4 inch drill bit.

For the drain, which needs to be larger than the faucet hole, we used this 1 and 3/4 inch Milwaukee Hole Dozer.

Done with the holes!
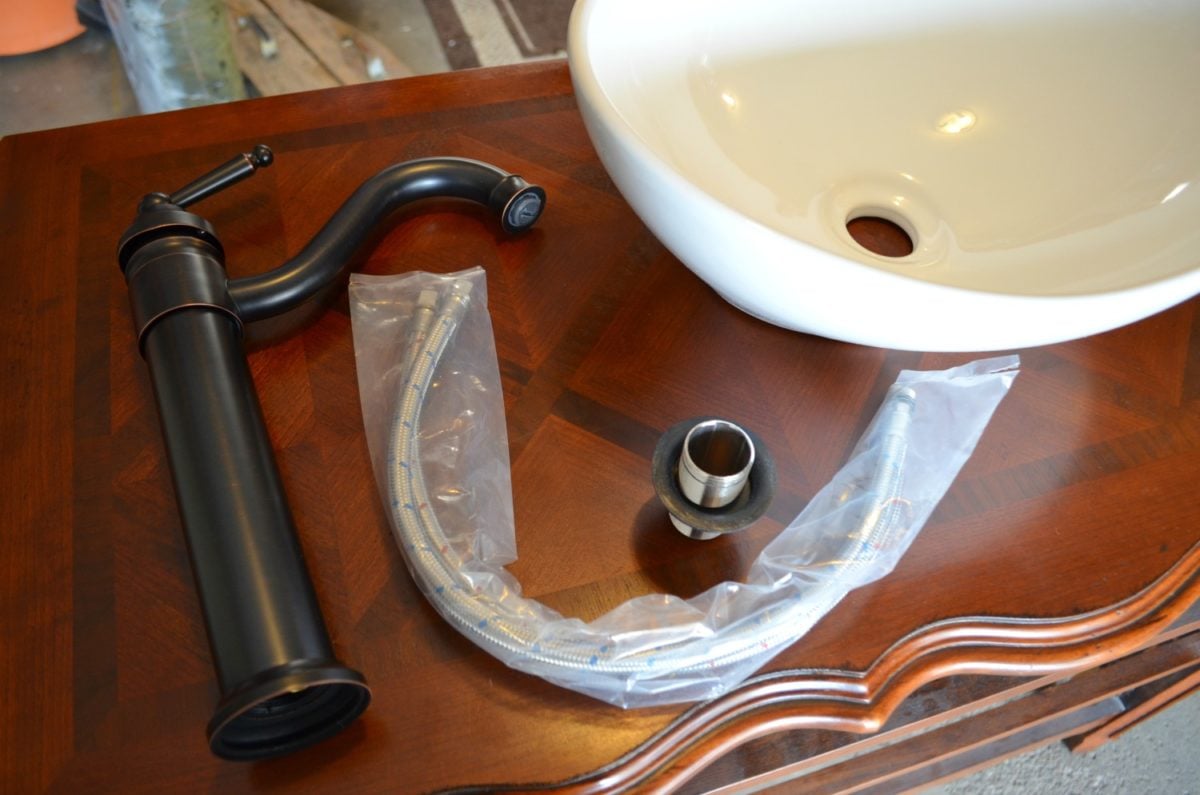
Now on to the hardware. We went with an oil rubbed bronze faucet. I like this one because it’s tall and has a nice curved spout. It fits perfectly over the vessel sink we chose, plus it comes with the hose you’ll need to install it. We decided to go with a sink that sits on top of the dresser, opposed to one that sits down inside the dresser. Honestly, I’ve just always loved this look and that was my vision for this project. I think it would be great either way. You can find the links for both the faucet and the sink we used at the end of this post.

For the drain, you want the pop-up vessel vanity drain without overflow (link listed below). We ordered the wrong one at first and had to return it. If you’re looking to replicate this process, this is definitely the one you want. This screws apart into two halves, which makes it really easy to install.

Boom! Holes are done and everything fits in nicely.

Next we measured the distance from the sink drain hole to the front of the dresser. This will tell you how deep your drawers can be before they’ll run into the plumbing lines–if you want them to be functional anyway. We started by just cutting the top two drawers–hoping the bottom drawer would fit in under the plumbing. You can always go back later and cut it if needed.


Measure twice, cut once!


We removed the back of the drawer so we could reuse it after cutting the sides.

Then use a nail gun to secure it in place. And there you have it, a perfect little drawer! After this process was finished up I went ahead and painted the dresser before moving it into the bathroom. I used Annie Sloan Chalk Paint in Pure White and sealed it with clear wax.

Now onto the plumbing process. Before putting the sink and drain in place, you’ll want to put a ring of 100% silicon around the drain hole. Then place the sink directly on top of that. This will keep things nice and sealed so water does not run out as it goes down the drain.

Next unscrew the drain and put the top half in place inside the sink. Again, go ahead and put silicon around the drain hole inside the sink as well (under that little rubber ring you see on bottom). That’s it for the top, now let’s move under to the actual plumbing. First you will want to tighten the faucet with the nut that comes with it. Easy peasy! Next on to the drain lines.

Take the bottom half of the drain and simply screw it on to the upper half that is hanging down. Make sure it’s nice and tight. Then you’ll want to take your drain line, we used the white 1 and 1/2 inch from Home Depot, and tighten that into place as well. It screws directly onto the drain.

Here’s the full drain line in place and attached to the wall. Lastly, go ahead and attach the faucet water lines to the hot and cold valves. And there you have it, the plumbing is done!

We ended up with two small drawers on top. Fortunately we were able to leave the bottom drawer alone, it fit in under the plumbing perfectly. Obviously this isn’t a ton of storage, and it doesn’t help that this is a smaller dresser, but this is on my husband’s side and he doesn’t need much storage anyway!

My husband also put these little “stoppers” on the back of the small drawers to keep them from falling out when pulled on. It actually worked really well, I highly recommend doing this!

Ta-da! The process is complete.


I loooooove this transformation. It’s been a dream of mine to use old dressers as vanities for years now. Then I saw it done on Fixer Upper a few times and from that point on I was completely obsessed. They are so fun and definitely the best part of our bathroom makeover, in my opinion. I love that it’s unique and different, but still really practical. I sealed everything with clear wax, but I may try to find another product to seal the top of the dresser even further.


Here’s the other vanity in the bathroom. As you can see it’s much larger. Notice we positioned the sink and faucet off to the side. In addition to giving me an open space for my “work” (aka makeup & hair), this also allowed us much more storage than if we had done the sink in the middle of the dresser. The drawers on the left are all full size and completely untouched. We only had to cut the top 3 drawers on the right side, so lots of storage is possible doing it this way!
So there you have it. Please let me know if you have any questions!
**POST UPDATE: The chalk paint/wax combo we used on these vanities has NOT held up well. Please read THIS POST to see a full update on this project.
Materials & Sources:
-
- Oil Rubbed Bronze Single Handle Faucet
- Pop Up Drain WITHOUT Overflow
- Egg Shape Vessel Sink
- Vanity Light Fixture
- Ceiling Light
- Shower Faucet
- Mirrors: Home Goods
- Towel Racks: Hobby Lobby
- 1.5 inch drain lines
- 100% silicon to seal drain line
- Paint Color: Smokestack by Behr

Love it!
That looks great! I really want to do this type of thing in my downstairs bathroom! My only concern is the plumbing access. If there is an issue with leaking, it doesn’t look like it’s very easy to deal with because of the drawers… The slats of wood are in the way. Or am I overthinking things?
This is amazing! Thank you so much for taking the time to detail each step. My husband loves the look and is in the process of hunting down a dresser.
You’re welcome Megan! I’m glad it was helpful to you. Good luck with yours!
Did you add a backing behind your light?
Mirror question: Did you DIY the mirror by adding trim on the inside?
Hi Wendy, that mirror actually came with two borders–one wooden and one was painted gold. So I just painted the gold one white. Easy! I found them at Home Goods if you’re curious.
This is so helpful! When painting this did you have to sand and do multiple coats? or did you just clean it off and put the paint right on??
Nope, I just painted it–no sanding, I only cleaned it up with a soapy rag. I believe it took 3 coats. I recently wrote a review on these painted vanities and I highly recommend reading this post before you chalk paint your bathroom vanities. https://sarahjoyblog.com/honest-review-chalk-painted-bathroom-vanities/
Loved the bathroom renovation and I am going to try and have “My sweet husband” try to do that with both of us doing it together. You have great ideas so keep them coming.
We’re working on our project right now. My question is regarding the finish. As the dresser will be in close proximity to water/dampness, wouldn’t you use a flat poly or something to make it more “water proof”? We found a great vintage dresser in oak and it’s perfect. Getting ready to prep it for paint and want to start that in a day or so.
Hi! How did your vanity turn out & did you use a protective finish? I’m in the prepping stage before I start painting the dresser. Every thing I’ve read has recommended using first a clear shallac, followed by a bonding adhesive primer, then finally an alkyd paint, especially since water will more than likely get on the vanity.
Love the look of this dresser turned into a vanity unit. Exactly what we are in the process of doing.
Great!!
Thanks for details! I have a dresser but wanted instructions or guidance. This is perfect! Very nice
I haven’t read other comments but a great way to seal chalk paint is polyacrylic.
I have required my grandmothers dresser and mirrow,and want to do this project also ,which I could send a picture of it to see if u think it will work,would like my sink to the side also ,because in the center I have only one drawer on dresser in the center
How about the depth. What is the smallest size you can use ?
Can you tell me the brand and name of the flooring you have in this bathroom with the dresser vanity? I love the colors.
I just bought an old 1940’s dresser to do this exact thing with!! Curious if you used Chalk paint or recommend something else? Also, did you sand it down first or just paint right over the top of the stain?
Looks great. Just curious why you didn’t cut a notch into the center of each of the top two drawers and then rebuild interior sides so that those two drawers had full storage space on the sides and a smaller nook in the center. I seen this in a number of both ready made and diy vanities with drawers.