Happy Monday friends! I’m soooooo excited for this post today because I get to share an update on our kitchen remodel. You guys, the pass-through is DONE. Eeeeek!! Cue all the jazz hands. If you read this post you saw how many obstacles we were running into when we initially started this project about a month ago. So many in fact that I started referring to this as the “wall of doom”. Yeah, it was that bad. Apparently this wall between the kitchen and our living room is like THE king of all walls in our home. It has a HVAC fresh air return, important electrical things, and tons of other issues that I won’t bore you with. Long story short, this wall is a pretty big deal. But despite all the issues, we were able to create a large pass-through that I am absolutely tickled pink about. It’s made such a big difference in our small kitchen. Here’s a little reminder of where we left off in my last update:

We removed all of the kitchen cabinets and the microwave, then the drywall between the studs. Doing this exposed a few issues we had to deal with–like discovering the HVAC fresh air return was located in the middle of the passthrough area. We ended up rerouting that over to the side of the wall and out through one of the lower cabinets, but that hiccup took a bit of time to deal with.

Next up was relocating electrical boxes, removing the tile backsplash, adding a header in the passthrough spot, and adding new drywall. Here’s how it looked before the studs came down…I’ll be honest, removing those was a little scary!

Ta-da! Studs are gone and the header with all its supporting boards are in place. Then the tile backsplash came down. I was sooooooo happy to see it go. Removing that old tile was a bit tricky–it pretty much took the drywall and all with it when it came down, as you can see in the photo above.

No more tile, thank goodness! New drywall went up and we were ready for the next step.

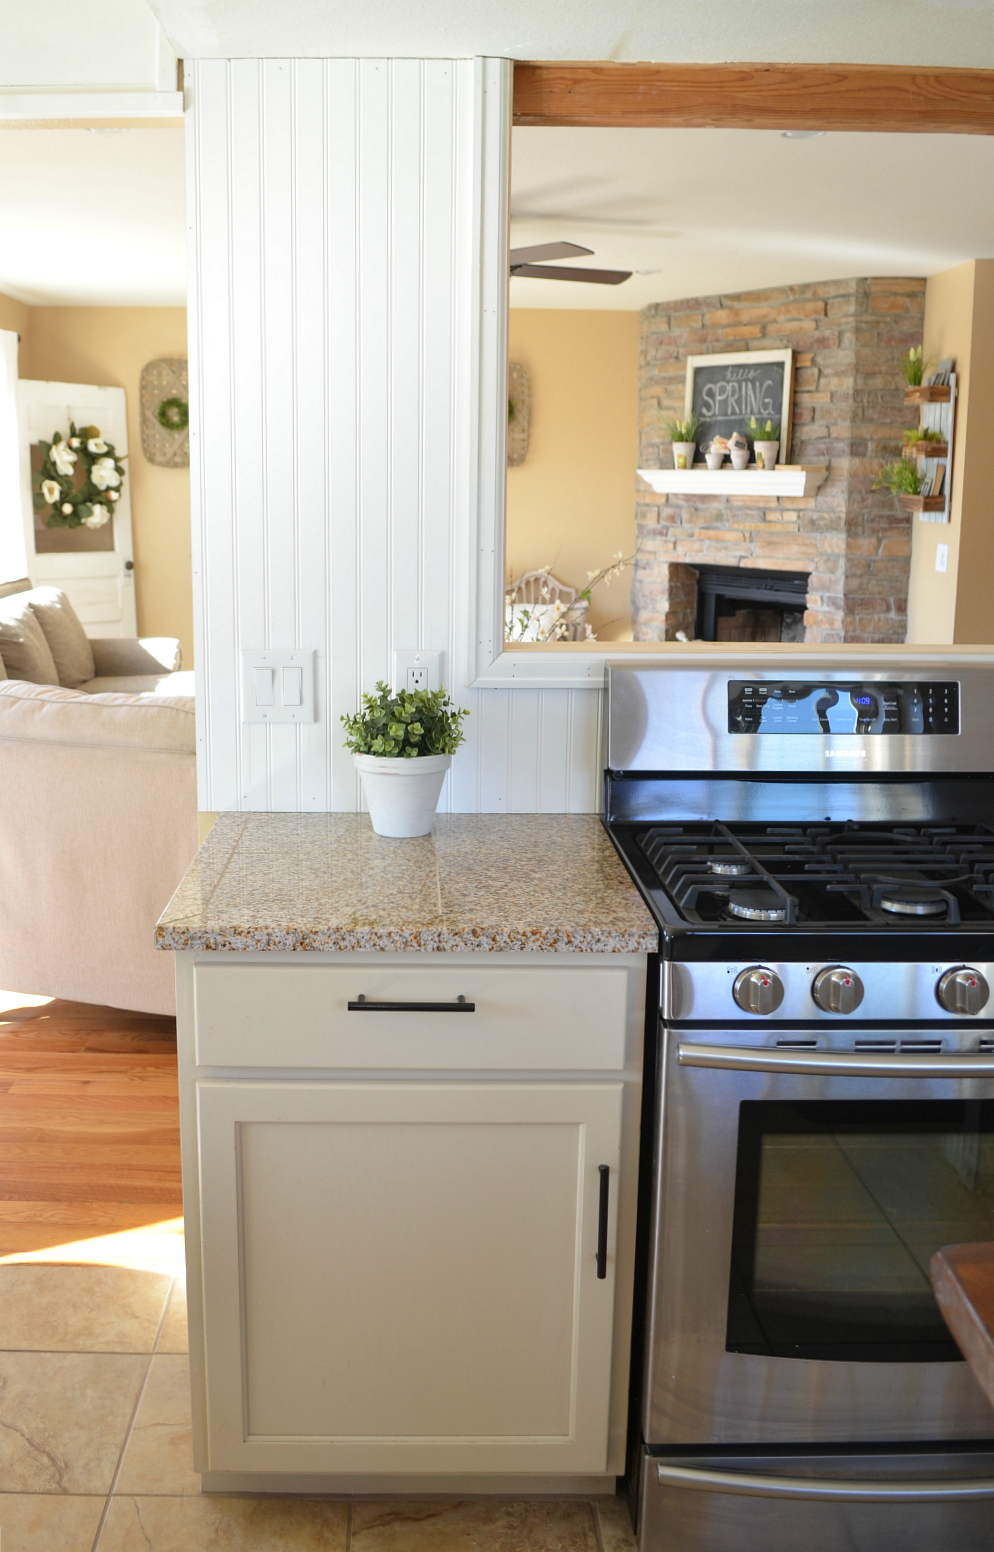
We tossed around a few ideas for this wall and it ultimately came down to two choices: new backsplash or beadboard. I was really pushing hard for beadboard for a few reasons: 1) It has an undeniable farmhouse feel, which you know I love. 2) It’s way more affordable than tile. 3) It’s much easier to install than tile and MUCH faster. It was really no contest for me–beadboard was the clear choice. Thankfully I was able to convince my hubby too!

And up it goes!


Eeeek! I’m so happy with how it looks. We framed out the passthrough, but left the header exposed–I wanted that rustic wood to get some attention too. Pretty big difference, right?!! Here’s a little reminder of how it all looked before:

And now:

We have more texture work to do on the back wall (obviously) but just look how it opens up this space from the living room. I used to absolutely hate this giant, closed off wall the way it was before. And I rarely ever shared it here on the blog. But now this area has a whole new feel. I LOVE it.

The kitchen side now:

And from the side:

Now:

It feels so much more open and spacious in here.

I’m so thrilled with how this pass through turned out and I’m just grateful we were able to pull it off. This project has been on our t0-do list from the day we moved in almost two years ago. And honestly, I really didn’t think it would happen–especially once we opened up the wall and saw how many issues we’d have to overcome. We obviously still have a ways to go–we need to paint, add more trim, etc. But I’m already in love with how this is looking now. And I think the beadboard was such a great choice. It really saved us a lot of time and money, which is awesome. The next step will be to add open shelves on either side of the passthrough and finish out the back wall. I’m really hoping my next update on this project will be the full reveal of this wall all pretty and fancy.
I’d love to hear what you think of our pass through and don’t hesitate to ask if you have any questions!

That turned out beautiful! I love your decorating style. Good job!!
Thank you so much Barbie!
It looks amazing!! I would have never thought to do bead board in place of tile, but it is absolute farmhouse perfection!
Thanks Ellen, it was so much cheaper!
Looks great! How do you compensate now for cabinets lost? Just wondering–we have a similar task to tackle. Also, what is the paint color of your cabinets? Looks love a nice, creamy color. Thanks, and I enjoy your blog. ????
Good question Linda. We actually only lost 3 cabinets, one of which was really small, so I haven’t really noticed. We are lucky to have three pantry-size cabinets on the other side of the kitchen so we get a lot of storage in that. I’m not sure on the color of the cabinets off the top of my head, I’ll have to look it up!
OK Linda, I found the paint color on the kitchen cabinets! It is Hush by Benjamin Moore.
It looks beautiful, but I’m curious as to what you are doing about ventilation for your cookstove now? I’m assuming there was a vent hood incorporated with the microwave that was there before.
Good questions. There was a small vent in the microwave we had there before, but that’s all we had. We don’t have to have one, so our plan is to leave it open.
Great farmhouse style all the way!!! Looks awesome Sarah!! And “thank you” for sharing
Thank you so much Joan!
This looks great! I love the passthrough and how you chose beadboard as the “backsplash”! You make it look so easy 🙂 Look forward to seeing what you do with the back wall!
Thanks Briana, I really appreciate that!
“Bead board is always a good idea” -that’s my motto ! It looks great and I can’t wait to see it when the open shelves are added . The best part will be to see how you “style” them ….you are so good at that.
High five Marilyn, that’s my motto for life!
L❤VE the beadboard Sarah! It looks amazing with your cabinet color and countertops! And I love the idea of open shelving! Cant wait to see it when it’s all done!
Thanks so much Jana, I can’t wait to get it all done!
Everything looks great! We thought about using beadboard for our wall treatment in the kitchen as well but opted for faux shiplop instead. The thought of trying to clean out splatters and spills from all those vertical grooves in the beadboard was enough to make me crazy. I love the look of it though and I’d love to hear your cleaning tips and tricks for it after you’ve had it for awhile!
Good point Erin. I’m hoping it isn’t that much worse than cleaning the tile backsplash we had before–it seems like everything stuck on that like glue!
Your kitchen remodel looks great! What a difference it made! Keep up the great work. I’m excited to see someone that loves farmhouse/vintage decor as much as I do.????
Thank you Suzi, I really appreciate that!
Looks absolutely wonderful! If it makes you feel any better I am envious of your kitchen size. I have a bolthole of a kitchen in a 740 sq ft apartment. Beadboard was such a great touch!
I’ve been there Kate, hang in there girl!
Oh my golly – it’s perfect! Love it. Now you won’t feel left out when cooking. Can hardly wait to see what you do with the open shelves!
Cindy, you are the sweetest. Thank you so much!
I, too, love beadboard. Questions: 1.) What specifically did you look for in selecting your beadboard? 2. ) Where did you buy it? 3.) Did you do anything special at the seams?
Nice job! ; )
Hi Linda! We bought the beadboard from Home Depot and went with the standard size, instead of the larger beadboard. And the seams actually meet up nicely, we’ll just finish them off with a small link of caulking and paint. That’s how we’ve done all our beadboard projects!
Looks wonderful! Question… is this a special beadboard that will clean up nicely from cooking splashes? I’ve heard there is some out there that is made for backsplashes.
Good question Julie! We actually only saw the standard beadboard at Home Depot, but I have heard of some that is more resistant to water damage and that kind of thing. We are considering doing this in the rest of our kitchen and I’m going to look for that kind if we do!
It is looking great, can’t wait to see finished project! We have a pass through also, trying to come up with new ideas!
Thanks Jody, I am just so happy it’s almost done!
Awesome love the bead board great choice and nice view from either side of pass through
Thanks Ruth, I love the view too!
That looks great. You’ve got quite an eye for design.
Thanks so much Michelle!
It really is amazing what a difference the pass through makes! I think the beadboard was a great choice, and easy to clean. Very nice!!!
Thanks Brenda, I really can’t believe what a difference it has made in the overall feel of this space. And so much more light! Can’t wait to finish it off.
Love the beadboard Sarah. Great choice. It all looks so great. Can’t wait to see it all finished. Love all your work and I am busy using some of your great ideas to turn my two bed rental into my own little vintage farmhouse.
Thanks Sharon! And your rental sounds awesome. I’m sure it will be a cozy little farmhouse cottage when you’re all done. Good luck!
THANK YOU, THANK YOU, THANK YOU–and many times more–for taking the time to answer my comment questions. In the past, I have sought information from other bloggers concerning a post and have received absolutely NO feedback. Your willingness to connect with us all and to treat each of us as worthy of your time (along with other things such as your faithful approach to life and practicality in decorating!) has made me a committed and total fan. Blessings.
Of course Linda, interacting with readers like you is my favorite part of having a blog in the first place. Wouldn’t want it any other way! 🙂 So glad to have you here.
Hi Sarah, I didn’t know where else to ask this question, but I noticed we have the same stove. Mine sure doesn’t look like yours regarding shine. May I ask you what product you use to clean? Also, the grates, do you use a certain soap or cleaner? I enjoy your blog, and your new project is absolutely beautiful. Thank you in advance for any help you could offer me.
Good question Denise. I have actually been using the Mrs. Meyer’s multi-surface cleaner on it. LOVE that stuff. And we usually just clean the grates with hot soapy water. Nothin’ special.
Sarah, it looks absolutely amazing. I love how open and airy it all looks. I love the bead board too!!!!
Thanks Doreen, I’m so happy with how it looks too. Beadboard for the win!
It looks great! It will be so nice to see your kids play in the other room. Are you going to miss the cabinets that were there? I always feel like I don’t have enough storage. The open shelves will be so much fun to show off your pretty decor. Y’all did a great job!!!
Oh it’s so nice to be able to see what they’re up to in the other room–so much nicer! And good question about the cabinets–thankfully I have a ton of large cabinets on the other side, so I’m all good there!
I have been watching your kitchen remodel and have a question for you. Did you install some kind of exhaust fan for you stove, or is it built into the stove. If it is built in what brand of stove did you purchase.
Thanks Kathy
We didn’t install any exhaust fan after removing the microwave, we really don’t need it actually. We got a few opinions and were told it wouldn’t be a problem, so we went with it!
I am wondering about where your exhaust is for your cook-top? Love your remodel and would like a cook-top without an upper vent but don’t know how to do it. Thanks!
We had several guys tell us we didn’t need one, so we actually don’t even have one. It’s been almost a year now and there haven’t been any issues!
Where did you put your microwave once you removed it from above the stove? I want to take mine down but don’t have much extra space.
We just removed it and didn’t replace it. And honestly, we haven’t really missed it!! You can get a small toaster oven to reheat food.
Hi,
It looks awesome! My range is on the same location and I want to do the same and was searching for ideas when I came to your post.
Thanks
Sabrina
Love it! We are actually looking at opening up our kitchen similar except we have to have a fan above the stove per local fire code for insurance. Interesting that your area allows you to have the stove/oven without a fan above as I like that look better 🙂
Looks, awesome, doing same type of project. What type of ventilation system do you have, and if none how is that working out? (range hood, fan +, downdraft etc)
Hello, can you tell me the measurements? I like to much!
Hi! I am considering a stove under a pass through in my house. Are there any cons? How about when cooking or not having ventilation? Do you notice any staining on the ceiling?
Love the new pass-through in your kitchen remodel! It’s so functional and adds so much versatility to your cooking space. Can’t wait to see the rest of the updates 😍
Sorry if you already answered this but where did you relocate your microwave to?
thankyou for this post